An Easier Way to Help Your Parents with their Tech Problems
Stuart Loh
•
General Counsel
•
Jul 25, 2024

As a millennial, I’ve spent much of my life helping my retired parents with the technology they use at home. They’re daily users – they have iPhones, iPads, laptops, and even a Windows desktop – but they’re not adept at setting things up or fixing them when they break.
Today, my parents live in another country, and troubleshooting their IT issues is no longer as simple as hopping in a car and dropping by their house. And anyone who has had to troubleshoot a problem by getting a parent to point their phone’s camera at their computer screen knows how painful that is. Moreover, different time zones make finding a convenient time for a video call (which can be quite long!) tough.
Remote desktop and screen sharing software helps a lot, but setting this up in a secure way is a concern. Opening ports into my parents’ home network creates a real security risk in a situation where there is already enough security risk (sorry Dad, but you really shouldn’t have clicked on that link).
Being able to securely access devices on my parents’ network at my convenience is an ideal situation to be in and it just so happens that the company I work at provides an ideal solution to achieve this. But setting up Twingate on their network, as simple as it is, is still a very big ask for my non-IT trained parents. Was there a way to do it without having to physically visit them while also minimizing what they had to do?
The answer is yes. It was a fun little project to figure out. The approach I arrived at required my parents to plug a cable into a live power socket… and that’s it.
Overview of the Approach
I describe exactly what I did further below, but before we get into that, here was my thought process.
To enable secure remote access to a network, all Twingate requires is a piece of software called a Connector to be installed on a device in that network. The Connector is the key component that provides “inside out” connectivity to the network for authorized users without having to reconfigure routers or firewalls, or open any ports into the network (both things that are asking for trouble, as far as my parents are concerned).
This was going to be the biggest challenge because the Connector needs to be installed on a supported device that is always on and always connected to the home WiFi network. Nothing in my parents’ house matched that description, so I ended up buying a new computer to host the Connector. These days a “new computer” can be quite economical and I picked up a Raspberry Pi Zero 2 W kit for less than $40. It’s among the cheapest computers you can get that has WiFi and supports a 64-bit operating system (which is needed by the Twingate Connector).
With the Pi in hand, I could configure it all in the comfort of my own home. The Pi would need to be configured to automatically connect to my parents’ WiFi network upon booting, and then automatically start the Connector.
Once configured, I could ship the Pi to my parents, have them plug it into any power socket, and it would boot and automatically connect. If the Pi lost power, it would restart itself when reconnected to power without any other intervention. As a bonus, the Connector would automatically update itself each time a new version was released. With that in place, I would be able to access any device on my parents’ network as if I was physically there.
Ok, here’s what I did. You can replicate these steps if you’ve ever been asked to play IT admin for your parents. (I set this up for my in-laws as well, who also live in a different country!) I’ve referred to parents throughout this post, but you can of course do this for anyone – other relatives, friends, and even clients if you’re in the IT business.
What I Used
Raspberry Pi Zero W 2
External case for the Raspberry Pi
Micro SD card (8GB, class 10 speed)
Mini-USB to USB-A cable
Power supply (you can use a spare Apple iPhone power plug if you have one)
Total cost: $42, shipped.
I also used a MacBook to install the Raspberry Pi’s operating system onto the SD card.
The whole process is headless – you don’t need to plug the Pi into a monitor, or connect a keyboard or mouse to access it. (I don’t own any corded keyboards or mice, so a headless process was a necessity for me.)
Step-by-Step Tutorial
Step 1. Install Raspberry Pi OS onto the micro SD card. The first thing to do is install the Raspberry Pi OS onto the micro SD card. The Pi uses the SD card as a hard drive.
On another computer, download the Raspberry Pi Imager and insert the SD card into the same machine.
Open the Raspberry Pi Imager and select the following options (the Storage item may vary depending on what machine you’re using):
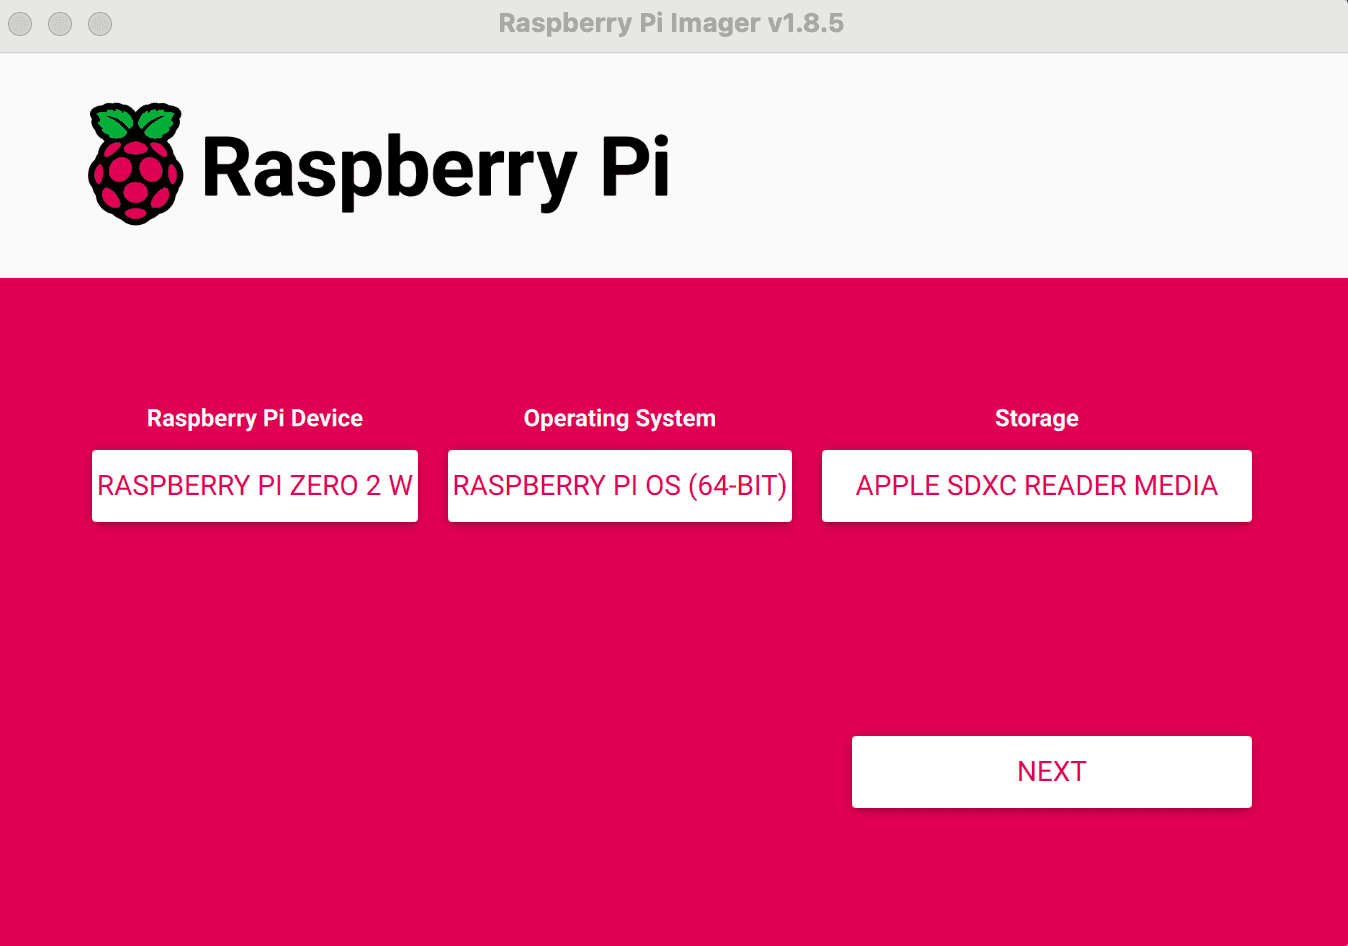
Click “Next”, then edit/customize your OS.
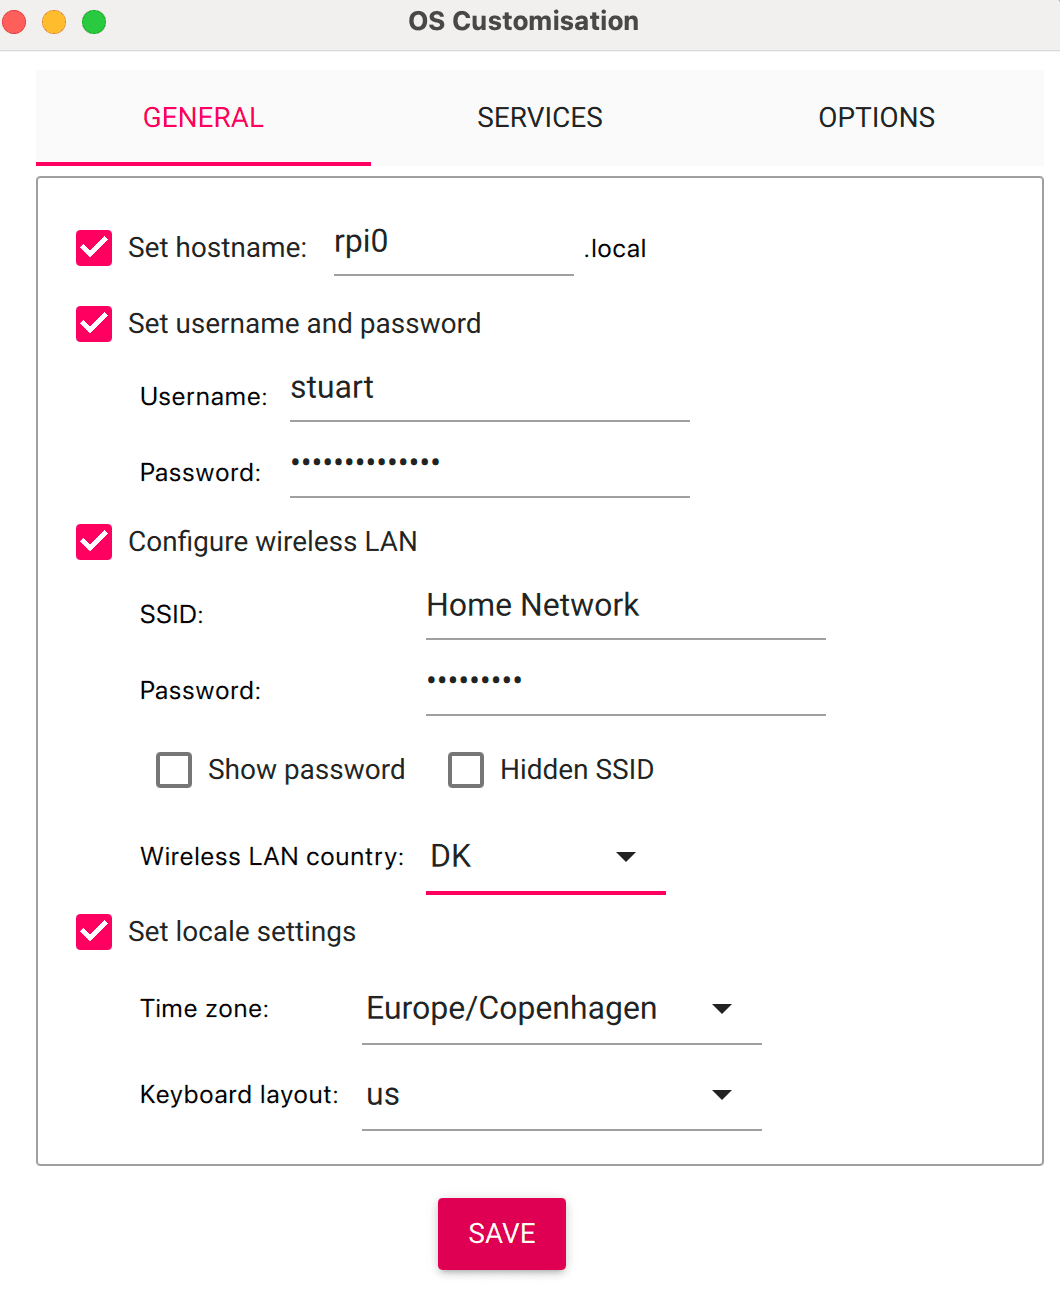
In the General tab, you’ll need to set (and remember) the hostname, username and password. You’ll also want to configure WiFi with your own network’s credentials:
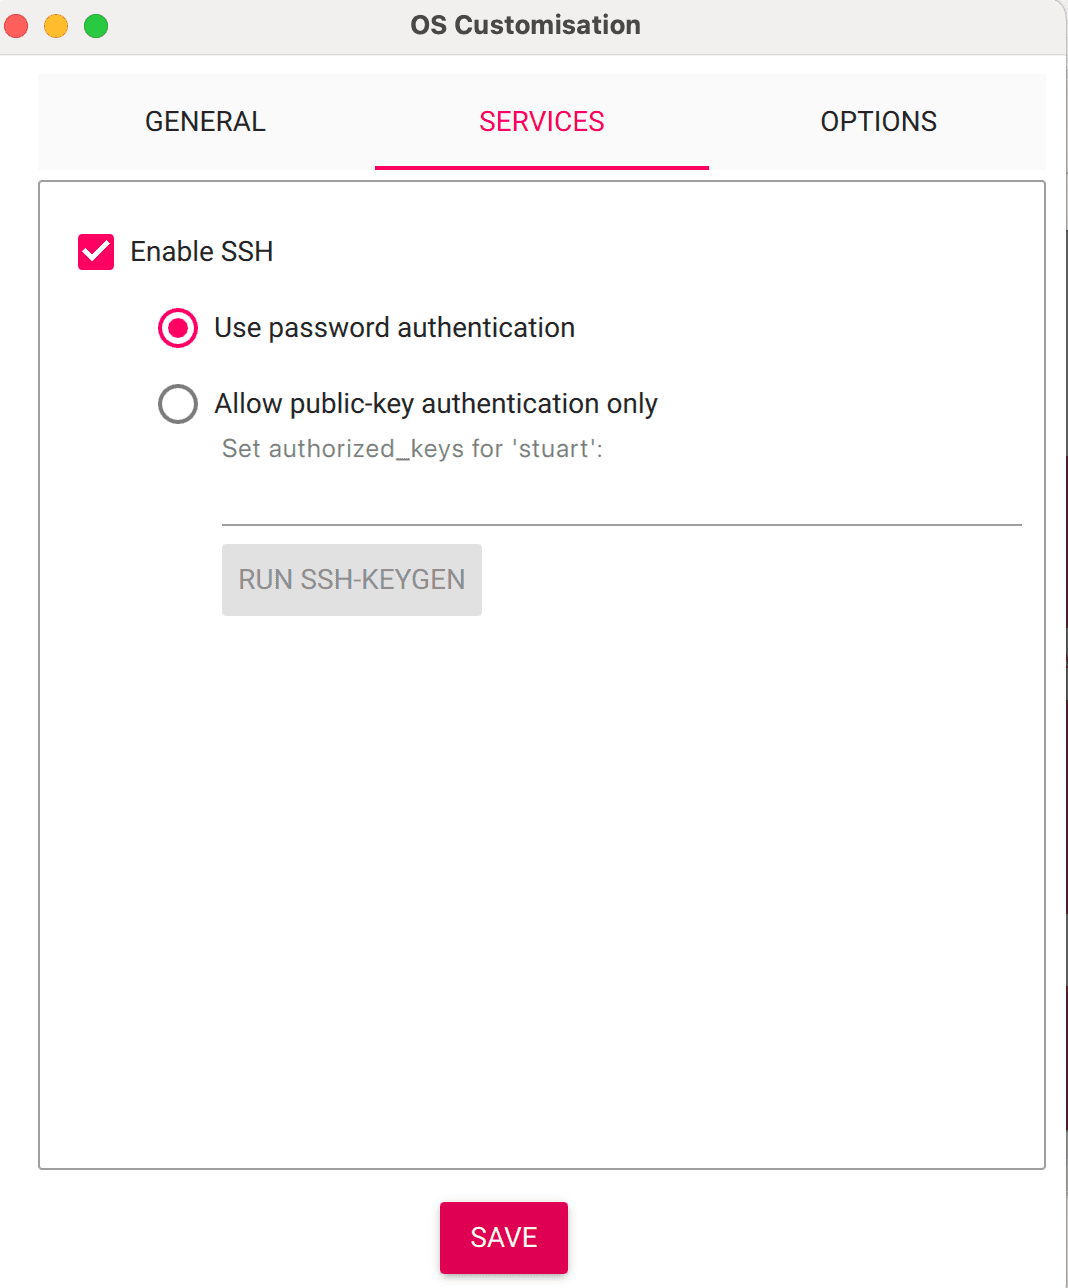
Next, enable SSH by clicking the Services tab and checking “Enable SSH”:
Click “Save” and then proceed through the rest of the wizard to install Raspian onto the micro SD card.
Step 2. Assemble and Boot the Pi. I recommend buying an external case for your Pi to provide it with protection and durability. Insert the SD card into the Pi and then insert the Pi into the case. Next, plug the Pi into power. The kit I bought came with a power supply with a mini-USB connector that goes into the Pi. It should boot up and come online.
Step 3. Connect to the Pi. Next, you’ll need to find out the IP address that was assigned to the Pi after it connected to your WiFi network. From a terminal window, running ping rpi0.local should produce an IP address:
stu@mbp-laptop ~ % ping rpi0.local
PING rpi0.local (192.168.1.22): 56 data bytes
64 bytes from 192.168.1.22: icmp_seq=0 ttl=64 time=47.208 ms
64 bytes from 192.168.1.22: icmp_seq=1 ttl=64 time=108.474 ms
64 bytes from 192.168.1.22: icmp_seq=2 ttl=64 time=10.094 ms
64 bytes from 192.168.1.22: icmp_seq=3 ttl=64 time=8.481 ms
In my case, the Pi has been assigned an IP address of 192.168.1.22.
Open an SSH connection to the Pi using the admin username and password you set up in the Raspberry Pi Imager. In my case: ssh stuart@192.168.1.22
Step 4. Install the Twingate Connector on the Pi. Raspian, the Pi’s standard operating system, is based on the Debian (Bookworm) distribution of Linux. Connectors can be deployed on Linux via a Docker container or as a systemd service. Given the relatively basic specs of the Pi Zero, I opted to run it as a systemd service rather than go through the process of installing Docker, which is more fiddly and resource intensive on the Pi.
Sign into the Twingate Admin Console.
Create a new Remote Network by clicking on “Remote Network” and the “+ Remote Network” button. Select “On Premise” as the Location and give your network a name.
Click on your newly created Remote Network. Click “+ Add Connector”
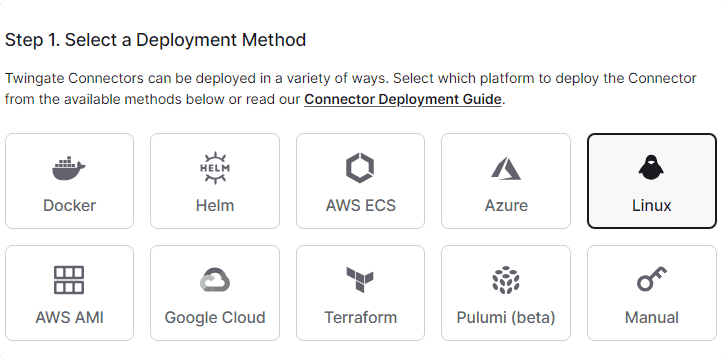
Click on the new Connector that was created. On the deployment page, click the Linux option:
Scroll down to step 2 and click the button to generate tokens. It will have you re-authenticate and then bring you back to this page:

(Optional) Scroll down to step 3 and enable optional real-time logging:

Scroll down to step 4. Copy the completed command and run it in your Pi’s terminal:
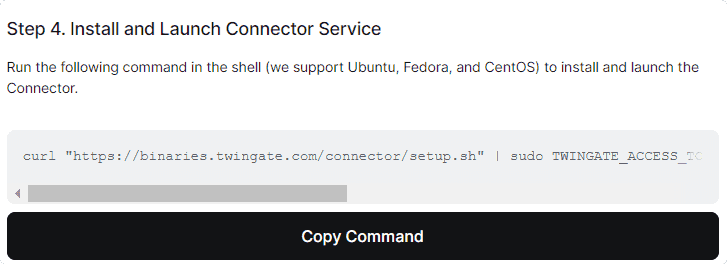
After installation is complete, verify that the Connector service is running with:
sudo systemctl status twingate-connectorIn the Twingate Admin Console, the dot on the icon for the new Connector should turn green to indicate that it is now working.
For more information, see How to Deploy a Connector on Linux.
Step 5. Setup WiFi on the Pi. To make the Pi truly plug and play for my parents, I had to configure it to automatically connect to their WiFi network. The main two pieces of information needed are the WiFi network name (SSID) and the WiFi network password. I already had their WiFi details and password stored on my phone from a past visit to their house. To do this, you have to add and store the WiFi network details on the Pi using the Pi’s `nmtui` NetworkManager tool.
Enter
nmtuiin a terminal.Select “Edit a connection”, then “Add”, then select “Wi-Fi”.
Fill out the details:
Profile name: A description of the WiFi profile (e.g.”Parental WiFi”).
Device: Can be blank.
SSID: The exact name of the WiFi network you need to store access credentials for.
Mode: <Client>.
Security: Whatever protocol the WiFi network uses (mine was WAP & WPA2 Personal).
Password: The Wi-Fi network’s password.
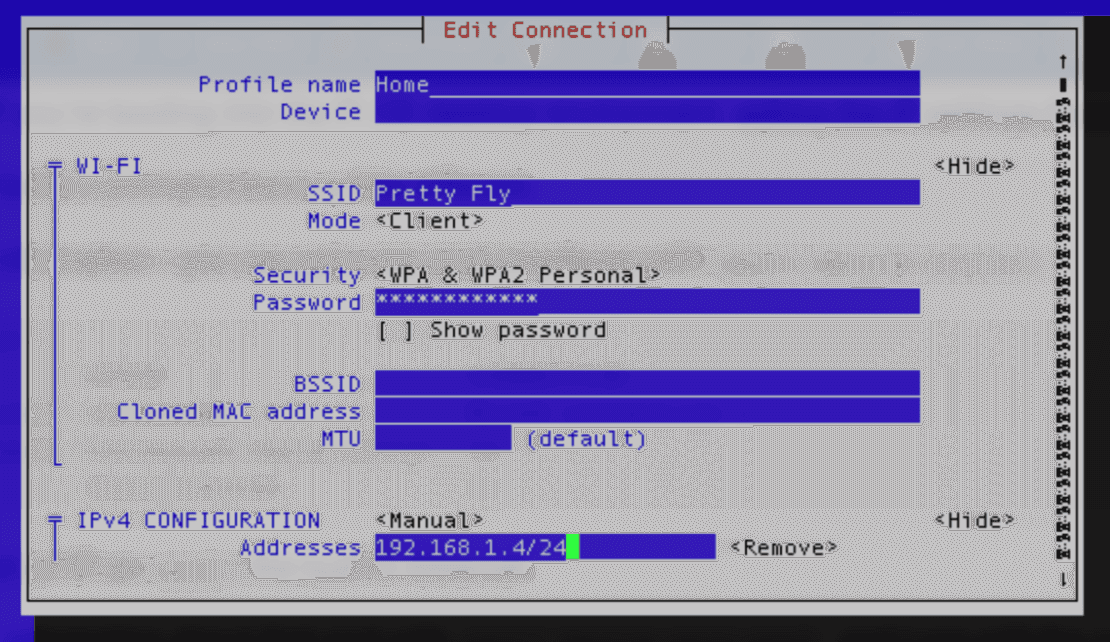
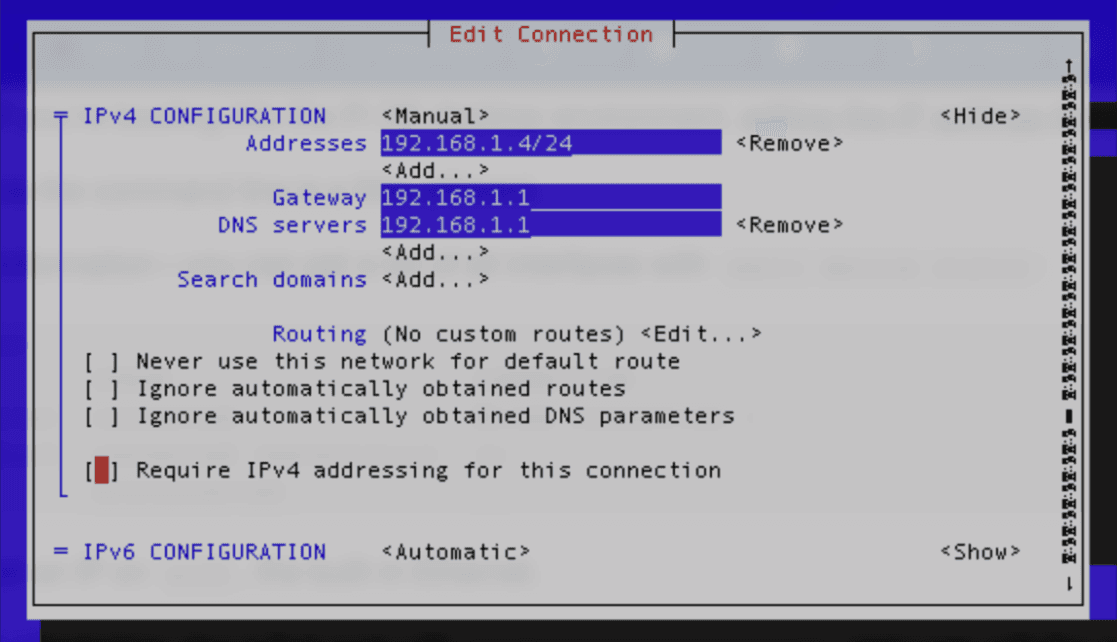
(Optional) Give your Pi a static IP. While it should be possible for Twingate to provide access to your Pi via the .local hostname you gave it in the Raspberry Pi Imager, in certain circumstances this may be problematic and you may need to resort to using its IP address instead. This will require you to ascertain what IP address your Pi will have when it’s installed on your parents’ network. Typically, the IP address is set by a DHCP server which may result in the IP address changing from time to time (and you’ll also have to figure out what IP address it is assigned when it first accesses the WiFi). Instead, consider giving your Pi a static IP address. This gives your Pi a predictable IP address that can be used with Twingate. To assign a static IP address, change “IPv4 Configuration” to “Manual” and type in an IP address, Gateway, and DNS server(s) under the “IPv4 Configuration” section. The IP address you select should be in the same network subnet but not conflict with any other IP address assigned to a device on the network, and preferably also exist outside of the range of IP addresses that the DHCP server can allocate.
To save the WiFi network details, scroll all the way down to the bottom and select “OK”.
Press Esc until you’ve exited NetworkManager.
Enter
sudo rebootat the terminal to reboot the Pi and effect the changed network settings.
The list of stored WiFi networks will be used when the Pi searches for one to connect to upon booting.
Step 6. Add the Pi as a Resource. Now you’ll need to add the Pi as a Resource to your Twingate Admin Console so you can access it remotely once it’s in your parents’ house.
Sign in to the Admin Console, click “Resources”, and then the “+ Resource” button.
At the top of the dialog box, select the Remote Network that you created in Step 4, give your Resource a label (e.g. “RPi Zero”) and either an IP address (here’s where the static IP address comes in handy) or the .local hostname you set up in the Raspberry Pi Imager.
Optionally, assign an Alias to the Resource (e.g. “pi.parents.home”), which can provide a more convenient way to access your Pi compared to typing in an IP address.
Click “Create Resource”.
If you know the addresses of other devices on the Remote Network that can be accessed, you can add them as Resources now, but you can also do this later once the Pi is hooked up to your parents’ network in the next step.
Step 7. Ship it – literally. The Pi is now ready! Get it delivered to your parents’ house. All they need to do is stick it into a power socket that’s in range of their WiFi network and after a couple minutes it should be accessible via Twingate. You’ll know it’s working when the Connector’s dot in the Admin Panel lights up as green.
Open a Twingate Client, sign in to your account, and all the Resources you’ve created for your parents’ Remote Network should be accessible as if you were directly connected to that network.
Additional Tips
But wait, there’s more! Below are some additional tips to get more usefulness out of your new, secure, remote access.
Tip 1. Automate Connector updates. Twingate updates Connectors periodically. We can automate the process of checking for updated versions and installing them if they are available.
SSH into the Pi (which you can now do remotely!) and run these two commands:
sudo tee -a /etc/cron.weekly/update-twingate-connector > /dev/null <<EOF
#!/bin/bash
sudo  -- sh -c 'apt update && apt install -yq twingate-connector && systemctl restart twingate-connector'
EOF

sudo chmod +x /etc/cron.weekly/update-twingate-connector
This adds a command to the Pi’s weekly cron job file (which, by default, runs at 6:47am every Sunday, local time). Note that the Connector will go down while it’s being updated, meaning that connectivity will be momentarily lost, but it will restore itself.
Tip 2. Enable remote desktop and screen sharing. Raspian comes with a VNC server included (VNC is software that enables remote control of a desktop). However, you’ll need to enable the VNC server before you can use it:
SSH into the Pi and type in sudo
raspi-config.Navigate to Interface Options and press Enter.
Select “VNC” and press Enter.
Change “Would you like the VNC Server to be enabled?” to “<Yes>” and press Enter.
Press Enter to return to the menu and then press Esc to exit raspi-config.
You’ll then need a VNC client to access the desktop remotely. TigerVNC, TightVNC and RealVNC are some examples, but there are many out there. Although macOS’s Screen Sharing app is compatible with VNC, it does not appear to work with the Pi’s VNC server.
Tip 3. Discover what devices you can control on the remote network. By using nmap on the Pi, you can scan all the devices on your parents’ network and then add them as Twingate Resources to control them.
SSH into the Pi and install
nmapwith the following commands:
sudo apt update
sudo apt install nmap
If it installs successfully, an
nmap -versioncommand will return the number of the nmap version installed.Scan the network with
nmap -sn 192.168.1.0/24(you may need to replace the IP address depending on what IP address subnet the remote network uses).
nmap -sn will list all the IP addresses it found that have a device assigned, and you can figure out what’s what from there. In this way, you can control not only computers and NAS devices, but printers, routers, and IoT devices as well.
If you don’t have a Twingate account already, try it out - the free Starter plan is perfect for use cases like this.
Rapidly implement a modern Zero Trust network that is more secure and maintainable than VPNs.
An Easier Way to Help Your Parents with their Tech Problems
Stuart Loh
•
General Counsel
•
Jul 25, 2024
As a millennial, I’ve spent much of my life helping my retired parents with the technology they use at home. They’re daily users – they have iPhones, iPads, laptops, and even a Windows desktop – but they’re not adept at setting things up or fixing them when they break.
Today, my parents live in another country, and troubleshooting their IT issues is no longer as simple as hopping in a car and dropping by their house. And anyone who has had to troubleshoot a problem by getting a parent to point their phone’s camera at their computer screen knows how painful that is. Moreover, different time zones make finding a convenient time for a video call (which can be quite long!) tough.
Remote desktop and screen sharing software helps a lot, but setting this up in a secure way is a concern. Opening ports into my parents’ home network creates a real security risk in a situation where there is already enough security risk (sorry Dad, but you really shouldn’t have clicked on that link).
Being able to securely access devices on my parents’ network at my convenience is an ideal situation to be in and it just so happens that the company I work at provides an ideal solution to achieve this. But setting up Twingate on their network, as simple as it is, is still a very big ask for my non-IT trained parents. Was there a way to do it without having to physically visit them while also minimizing what they had to do?
The answer is yes. It was a fun little project to figure out. The approach I arrived at required my parents to plug a cable into a live power socket… and that’s it.
Overview of the Approach
I describe exactly what I did further below, but before we get into that, here was my thought process.
To enable secure remote access to a network, all Twingate requires is a piece of software called a Connector to be installed on a device in that network. The Connector is the key component that provides “inside out” connectivity to the network for authorized users without having to reconfigure routers or firewalls, or open any ports into the network (both things that are asking for trouble, as far as my parents are concerned).
This was going to be the biggest challenge because the Connector needs to be installed on a supported device that is always on and always connected to the home WiFi network. Nothing in my parents’ house matched that description, so I ended up buying a new computer to host the Connector. These days a “new computer” can be quite economical and I picked up a Raspberry Pi Zero 2 W kit for less than $40. It’s among the cheapest computers you can get that has WiFi and supports a 64-bit operating system (which is needed by the Twingate Connector).
With the Pi in hand, I could configure it all in the comfort of my own home. The Pi would need to be configured to automatically connect to my parents’ WiFi network upon booting, and then automatically start the Connector.
Once configured, I could ship the Pi to my parents, have them plug it into any power socket, and it would boot and automatically connect. If the Pi lost power, it would restart itself when reconnected to power without any other intervention. As a bonus, the Connector would automatically update itself each time a new version was released. With that in place, I would be able to access any device on my parents’ network as if I was physically there.
Ok, here’s what I did. You can replicate these steps if you’ve ever been asked to play IT admin for your parents. (I set this up for my in-laws as well, who also live in a different country!) I’ve referred to parents throughout this post, but you can of course do this for anyone – other relatives, friends, and even clients if you’re in the IT business.
What I Used
Raspberry Pi Zero W 2
External case for the Raspberry Pi
Micro SD card (8GB, class 10 speed)
Mini-USB to USB-A cable
Power supply (you can use a spare Apple iPhone power plug if you have one)
Total cost: $42, shipped.
I also used a MacBook to install the Raspberry Pi’s operating system onto the SD card.
The whole process is headless – you don’t need to plug the Pi into a monitor, or connect a keyboard or mouse to access it. (I don’t own any corded keyboards or mice, so a headless process was a necessity for me.)
Step-by-Step Tutorial
Step 1. Install Raspberry Pi OS onto the micro SD card. The first thing to do is install the Raspberry Pi OS onto the micro SD card. The Pi uses the SD card as a hard drive.
On another computer, download the Raspberry Pi Imager and insert the SD card into the same machine.
Open the Raspberry Pi Imager and select the following options (the Storage item may vary depending on what machine you’re using):
Click “Next”, then edit/customize your OS.
In the General tab, you’ll need to set (and remember) the hostname, username and password. You’ll also want to configure WiFi with your own network’s credentials:
Next, enable SSH by clicking the Services tab and checking “Enable SSH”:
Click “Save” and then proceed through the rest of the wizard to install Raspian onto the micro SD card.
Step 2. Assemble and Boot the Pi. I recommend buying an external case for your Pi to provide it with protection and durability. Insert the SD card into the Pi and then insert the Pi into the case. Next, plug the Pi into power. The kit I bought came with a power supply with a mini-USB connector that goes into the Pi. It should boot up and come online.
Step 3. Connect to the Pi. Next, you’ll need to find out the IP address that was assigned to the Pi after it connected to your WiFi network. From a terminal window, running ping rpi0.local should produce an IP address:
stu@mbp-laptop ~ % ping rpi0.local
PING rpi0.local (192.168.1.22): 56 data bytes
64 bytes from 192.168.1.22: icmp_seq=0 ttl=64 time=47.208 ms
64 bytes from 192.168.1.22: icmp_seq=1 ttl=64 time=108.474 ms
64 bytes from 192.168.1.22: icmp_seq=2 ttl=64 time=10.094 ms
64 bytes from 192.168.1.22: icmp_seq=3 ttl=64 time=8.481 ms
In my case, the Pi has been assigned an IP address of 192.168.1.22.
Open an SSH connection to the Pi using the admin username and password you set up in the Raspberry Pi Imager. In my case: ssh stuart@192.168.1.22
Step 4. Install the Twingate Connector on the Pi. Raspian, the Pi’s standard operating system, is based on the Debian (Bookworm) distribution of Linux. Connectors can be deployed on Linux via a Docker container or as a systemd service. Given the relatively basic specs of the Pi Zero, I opted to run it as a systemd service rather than go through the process of installing Docker, which is more fiddly and resource intensive on the Pi.
Sign into the Twingate Admin Console.
Create a new Remote Network by clicking on “Remote Network” and the “+ Remote Network” button. Select “On Premise” as the Location and give your network a name.
Click on your newly created Remote Network. Click “+ Add Connector”
Click on the new Connector that was created. On the deployment page, click the Linux option:
Scroll down to step 2 and click the button to generate tokens. It will have you re-authenticate and then bring you back to this page:
(Optional) Scroll down to step 3 and enable optional real-time logging:
Scroll down to step 4. Copy the completed command and run it in your Pi’s terminal:
After installation is complete, verify that the Connector service is running with:
sudo systemctl status twingate-connectorIn the Twingate Admin Console, the dot on the icon for the new Connector should turn green to indicate that it is now working.
For more information, see How to Deploy a Connector on Linux.
Step 5. Setup WiFi on the Pi. To make the Pi truly plug and play for my parents, I had to configure it to automatically connect to their WiFi network. The main two pieces of information needed are the WiFi network name (SSID) and the WiFi network password. I already had their WiFi details and password stored on my phone from a past visit to their house. To do this, you have to add and store the WiFi network details on the Pi using the Pi’s `nmtui` NetworkManager tool.
Enter
nmtuiin a terminal.Select “Edit a connection”, then “Add”, then select “Wi-Fi”.
Fill out the details:
Profile name: A description of the WiFi profile (e.g.”Parental WiFi”).
Device: Can be blank.
SSID: The exact name of the WiFi network you need to store access credentials for.
Mode: <Client>.
Security: Whatever protocol the WiFi network uses (mine was WAP & WPA2 Personal).
Password: The Wi-Fi network’s password.
(Optional) Give your Pi a static IP. While it should be possible for Twingate to provide access to your Pi via the .local hostname you gave it in the Raspberry Pi Imager, in certain circumstances this may be problematic and you may need to resort to using its IP address instead. This will require you to ascertain what IP address your Pi will have when it’s installed on your parents’ network. Typically, the IP address is set by a DHCP server which may result in the IP address changing from time to time (and you’ll also have to figure out what IP address it is assigned when it first accesses the WiFi). Instead, consider giving your Pi a static IP address. This gives your Pi a predictable IP address that can be used with Twingate. To assign a static IP address, change “IPv4 Configuration” to “Manual” and type in an IP address, Gateway, and DNS server(s) under the “IPv4 Configuration” section. The IP address you select should be in the same network subnet but not conflict with any other IP address assigned to a device on the network, and preferably also exist outside of the range of IP addresses that the DHCP server can allocate.
To save the WiFi network details, scroll all the way down to the bottom and select “OK”.
Press Esc until you’ve exited NetworkManager.
Enter
sudo rebootat the terminal to reboot the Pi and effect the changed network settings.
The list of stored WiFi networks will be used when the Pi searches for one to connect to upon booting.
Step 6. Add the Pi as a Resource. Now you’ll need to add the Pi as a Resource to your Twingate Admin Console so you can access it remotely once it’s in your parents’ house.
Sign in to the Admin Console, click “Resources”, and then the “+ Resource” button.
At the top of the dialog box, select the Remote Network that you created in Step 4, give your Resource a label (e.g. “RPi Zero”) and either an IP address (here’s where the static IP address comes in handy) or the .local hostname you set up in the Raspberry Pi Imager.
Optionally, assign an Alias to the Resource (e.g. “pi.parents.home”), which can provide a more convenient way to access your Pi compared to typing in an IP address.
Click “Create Resource”.
If you know the addresses of other devices on the Remote Network that can be accessed, you can add them as Resources now, but you can also do this later once the Pi is hooked up to your parents’ network in the next step.
Step 7. Ship it – literally. The Pi is now ready! Get it delivered to your parents’ house. All they need to do is stick it into a power socket that’s in range of their WiFi network and after a couple minutes it should be accessible via Twingate. You’ll know it’s working when the Connector’s dot in the Admin Panel lights up as green.
Open a Twingate Client, sign in to your account, and all the Resources you’ve created for your parents’ Remote Network should be accessible as if you were directly connected to that network.
Additional Tips
But wait, there’s more! Below are some additional tips to get more usefulness out of your new, secure, remote access.
Tip 1. Automate Connector updates. Twingate updates Connectors periodically. We can automate the process of checking for updated versions and installing them if they are available.
SSH into the Pi (which you can now do remotely!) and run these two commands:
sudo tee -a /etc/cron.weekly/update-twingate-connector > /dev/null <<EOF
#!/bin/bash
sudo  -- sh -c 'apt update && apt install -yq twingate-connector && systemctl restart twingate-connector'
EOF

sudo chmod +x /etc/cron.weekly/update-twingate-connector
This adds a command to the Pi’s weekly cron job file (which, by default, runs at 6:47am every Sunday, local time). Note that the Connector will go down while it’s being updated, meaning that connectivity will be momentarily lost, but it will restore itself.
Tip 2. Enable remote desktop and screen sharing. Raspian comes with a VNC server included (VNC is software that enables remote control of a desktop). However, you’ll need to enable the VNC server before you can use it:
SSH into the Pi and type in sudo
raspi-config.Navigate to Interface Options and press Enter.
Select “VNC” and press Enter.
Change “Would you like the VNC Server to be enabled?” to “<Yes>” and press Enter.
Press Enter to return to the menu and then press Esc to exit raspi-config.
You’ll then need a VNC client to access the desktop remotely. TigerVNC, TightVNC and RealVNC are some examples, but there are many out there. Although macOS’s Screen Sharing app is compatible with VNC, it does not appear to work with the Pi’s VNC server.
Tip 3. Discover what devices you can control on the remote network. By using nmap on the Pi, you can scan all the devices on your parents’ network and then add them as Twingate Resources to control them.
SSH into the Pi and install
nmapwith the following commands:
sudo apt update
sudo apt install nmap
If it installs successfully, an
nmap -versioncommand will return the number of the nmap version installed.Scan the network with
nmap -sn 192.168.1.0/24(you may need to replace the IP address depending on what IP address subnet the remote network uses).
nmap -sn will list all the IP addresses it found that have a device assigned, and you can figure out what’s what from there. In this way, you can control not only computers and NAS devices, but printers, routers, and IoT devices as well.
If you don’t have a Twingate account already, try it out - the free Starter plan is perfect for use cases like this.
Solutions
Solutions
The VPN replacement your workforce will love.
Solutions