Encryption in Twingate
How Twingate secures all communications between Client, Connector, Relays and Controller
Twingate offers better security than a traditional VPN because, among other aspects, it does not require any open inbound ports to operate. Twingate’s Clients and Connectors communicate securely without them. To achieve this, Twingate relies on two components which are hosted by the customer (the Client, deployed on an end user’s device, and the Connector, deployed behind the firewall within the customer’s infrastructure), and two components hosted by Twingate (the Relays and Controller). This article explains how communications are secured between these components.
The goals of encryption
At Twingate, the overall objective of our encryption scheme, like any good encryption scheme, is twofold:
- Confidentiality: We need to ensure that traffic between user components (Clients and Connectors) are encrypted and cannot be decrypted by any third party (including Twingate)
- Authentication: we need to ensure that user components (Clients and Connectors) can identify the other components they communicate with and ensure they are legitimate (Relays and Controller), especially as Relays and Controllers are visible on the public internet
This is generalizable to anyone connecting to anything that is publicly visible on the internet and is sensitive in nature, outside of Twingate. For instance, when you use your browser to check your bank account, you don’t want anyone to be able to inspect the traffic from your browser to the bank’s servers, and you want to ensure that your browser is talking to the right server and not a rogue entity impersonating your bank that wants to steal your credentials.
How encryption on the internet works (HTTPS / TLS)
Let’s start with authentication first: The Client and Connector ensure that the Relays and Controller are legitimate the same way your browser validates your bank’s website when banking online. It uses HTTPS which means it uses TLS (Transport Layer Security, https is http secured by TLS).
Let’s take a look at how HTTPS/TLS is used when you connect to your bank’s website:
Before your browser sends anything to your bank at, say, mybank.com, it first needs to know where to send packets of data. Since computers don’t understand domain names like mybank.com, DNS comes into play and translates mybank.com into the public IP of your bank’s server, sends the information back to your browser, which now knows where to send data.
Once the browser knows what IP address corresponds to mybank.com, it tries to connect to it:
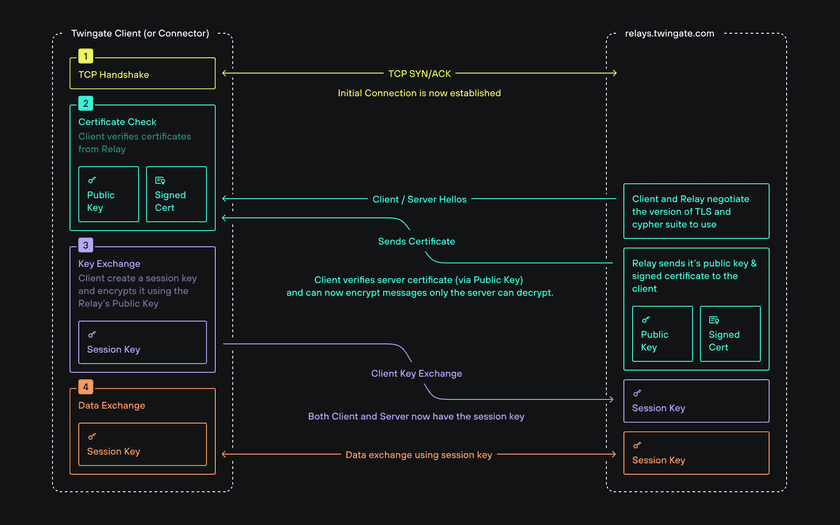
- Your browser sends some network packets to your bank’s public IP (which responds by sending packets as part of what is called a TCP handshake), subsequently, browser and server negotiate what method they will both use to encrypt traffic between each other (as part of what is called a TLS handshake).
- The bank’s server sends its own signed certificate to your browser as a way to authenticate itself. The signed certificate contains, among other things, the bank’s public key, the name of a Certificate Authority (CA for short) and the CA’s own public key. The CA, signed certificate and public keys all serve the purpose of authenticating the bank’s server from the standpoint of your browser.
Before we go any further, let’s define the concepts we have just introduced.
Public & private keys
a public key is associated with asymmetric encryption and is part of a pair of two keys (the other one being called a private key). Unlike symmetric encryption (which relies on a single secret key used to both encrypt and decrypt), asymmetric encryption implies that both keys have different roles and characteristics:
The public key:
- Can be shared publicly
- Can be used to encrypt any message but cannot be used to decrypt (which is why it can be shared publicly)
- Can be used to verify that signatures were encrypted with the corresponding private key
The private key:
- Should never be shared publicly
- Can encrypt and decrypt messages encrypted by the corresponding public key (which is why it must remain private)
- Can be use to create signatures
Signed certificates
A signed certificate is shared by a publicly available entity (such as an organization serving its website over HTTPS) with any party requesting to verify the authenticity of the entity. It contains publicly available information such as, among other things:
- the public key of the entity (used by browsers to encrypt and send messages that can only be decrypted by the entity’s private key)
- the name of a third party used to sign its certificate (this third party is called a Certificate Authority and is a mutually trusted intermediary)
- the public key of the Certificate Authority (used to verify the authenticity of a signed certificate)
Certificate Authorities (CA)
A CA is an organization recognized as a universally trusted public third party (examples include Google, Let’s Encrypt, IdenTrust, DigiCert, etc.).
A CA has its own pair of public and private key: its private key is used to sign certificates presented by entities that need to serve secure & trusted connections over public networks like the internet, while its public key is used by browsers to verify the authenticity of signed certificates.
Certificate Signing and Certificate validation
How a certificate is signed by a CA
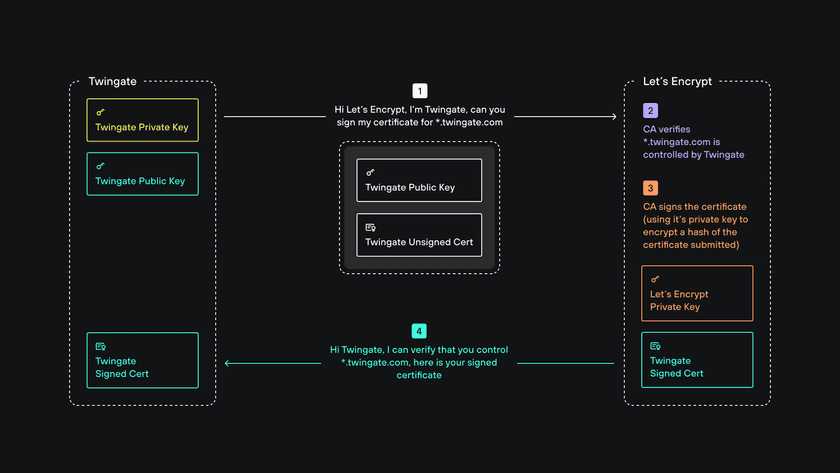
When an entity like Twingate wants to obtain a signed certificate for its domain (twingate.com), it contacts a CA (Let’s Encrypt, in our case) and makes a claim on its domain. The CA then verifies the requesting entity is who it says it is and that it has full control over the domain (different methods are used by different CAs). The CA then uses its own private key to sign the certificate (it encrypts a hash of the certificate) and sends the signed certificate back to the requesting entity.

How a signed certificate is verified by a browser
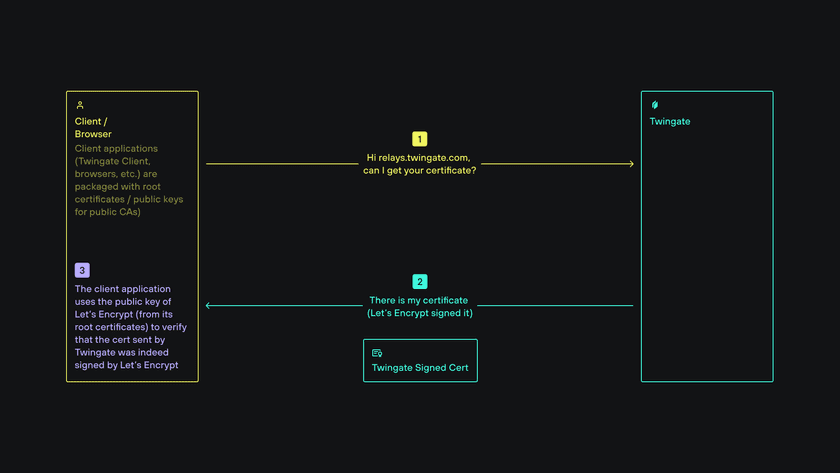
Client applications such as browsers (or the Twingate Client) come prepackaged with trusted root certificates from CAs (those include CA public keys). Because a public key can be used to verify that certificate was signed using its corresponding private key, the browser can verify signed certificates shared by public entities.

Encrypting communication once authentication is established
Let’s get back to our browser communicating with the bank.
At this point, the browser has ensured that the bank’s server is legitimate by verifying its signed certificate. Because the browser has access to the bank’s public key, it can encrypt messages that only the bank’s server can decrypt. The same asymmetric encryption scheme could be used in reverse to encrypt packets originating from the bank and sent to the browser however this is not what happens in practice: browser and server switch to symmetric encryption instead because it is much less computationally intensive than asymmetric encryption. To achieve this, the browser generates a secret key (also called a session key) which it shares with the bank’s server by encrypting it using the bank’s public key. The server receives the encrypted key and decrypts it. It is subsequently used to encrypt all further communication between browser and server.
Securing traffic to Twingate Relays & Controller
If you understand the above then, good news, you also now understand how Twingate Clients and Connectors communicate with Relays & Controller securely: Clients and Connectors assume the role of the browser while Relays & Controller assume the role of the bank’s server.

Securing Traffic between Clients and Connectors
So far we’ve established how private components like Clients and Connectors manage to communicate securely to our publicly hosted Relays but have not explained how encryption works between Clients and Connectors. The same goals of confidentiality and authentication apply whether the transport mechanism between them is peer-to-peer or via Relays:
Because Clients and Connectors verify the authenticity of the Controller, it is considered the “root of trust” by both. The Connector has two important aspects:
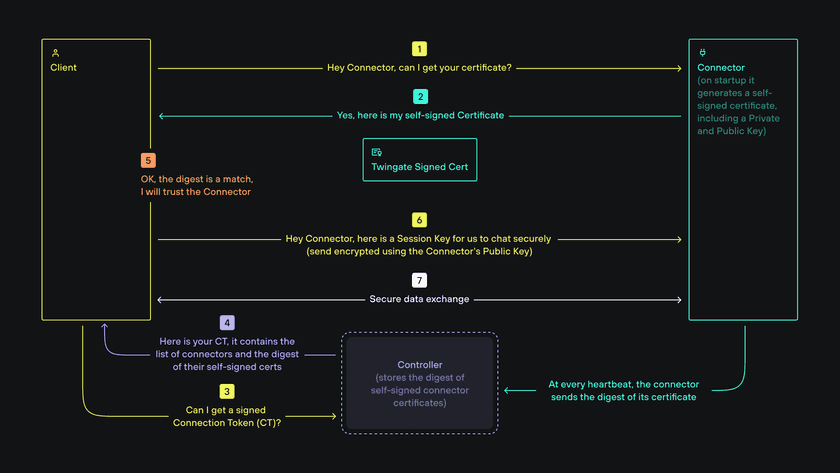
- At startup time, the Connector generates a public and private key pair used by the Connector to generate a self-signed certificate.
- When active, the Connector sends a regular heartbeat to the Controller containing a digest/fingerprint (SHA-256) of its self signed certificate, which the Controller then stores.
When a Client connects to a Connector:
- The Client requests the self-signed certificate from the Connector
- The Connector presents its self-signed certificate to the Client
- The Client requests a Connection Token (CT) from the Controller
- The Controller issues a Connection Token (which is a JWT token signed by the Controller) and sends it to the Client (the CT contains the SHA-256 digest of the self-signed certificate from the Connector via its heartbeat)
- The Client receives the Connection Token, verifies its authenticity and verifies that the SHA-256 digest of the Connector’s self-signed certificate is identical to the digest received from the Connector directly
- Upon verification, trust between Client and Connector is established and the Client shares a session key with the Connector using the Connector’s public key
- Subsequent data transfer between Client and Connector is now encrypted via the session key

This process is true whether communication between a Client and Connector is peer-to-peer or via Relays. It is important to note that nothing between a Client and Connector (including any Relays) can decrypt packets because they are encrypted by a session key generated by the Client and shared with the Connector using a public key from its self-signed certificate.
Last updated 10 months ago